Cloud computing offers great possibilities to learn Linux newcomers. Why would you like to learn Linux? Because if you want to large scale computations, data mining or big data analytics there is virtually no other reasonable option.
What makes the cloud technology great is the very minimal effort required to set up and start using a fully functional Linux machine. In this tutorial I will show how to setup a Linux server in the Amazon Web Services cloud and how to connect to it. I will present how to set up a terminal connection (command line) and how to browse files your Linux server when connecting to your cloud instance.
Prerequisites
The following prerequisites are required to for this tutorial:- Open an Amazon Web Services (AWS) account. Go to https://aws.amazon.com/ to set-up an account. Detailed instructions can be found in my previous post.
- Go to http://www.putty.org/ and download Putty. You will need two files:
putty.exeandputtygen.exe. Please note that no installation is required. - Go to http://winscp.net/ and download WinSCP. Choose either “Installation package” or “Portable executables” depending on your preference
Setting up a Linux machine in the cloud
Please follow these steps to start an EC2 instance in the cloud
- Login to your an Amazon Web Services (AWS) account at http://console.aws.amazon.com/
- From available services select EC2 - Virtual Servers in the cloud

- Press the “Launch Instance”
 button
 - Select “Ubuntu Server 14.04 LTS (HVM), SSD Volume (64-bit)”. Press
 .
. - In the “Choose an Instance Type” screen select a hardware to run your Linux. For computational purposes you usually want
c4.*instances but it might depend for specific use case. For demo and tutorial purposes uset2.micro. If you do not know what to choose please selectt2.micro. - Click “Review and Launch”
- Click “Launch”
 in the right bottom corner
 - Create a new key pair that will be used to connect to your instance (or use an existing key pair if you already have one) . If you select to create a key pair, download the
*.pemkey file and store it in a secure location. After a key pair is set click “Launch instances”

- You will see a message “Your instances are now launching”. Click on the instance name starting with “i-”.

- After clicking the link you will go to the “Instance list” screen

- Copy to the console the “Public DNS address” (in this example ec2-52-23-164-62.compute-1.amazonaws.com)
- Now you are ready to connect to your new Linux server!. Please go to the next section of this tutorial to see the instructions on how to connect.
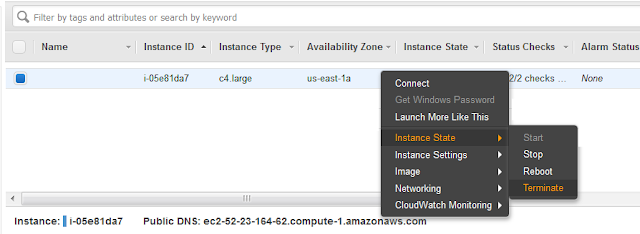
- The setup is complete! Remember to shut down the instance after finishing your computations. In order to shut down an instance right click on it and set either “stop” (to continue using it later) or “terminate” (deletes the instance, you loose the main partition).
Connecting to an EC2 Linux virtual machine
Converting your key to putty/WinScp format
Putty and WinSCP use*.ppk file format rather than *.pem that was exported from the AWS web site in the previous section. Hence, you need to convert the file format.- Run
puttygen.exe - Press “Load”

- In the “Load private key” dialog select “All file types” and select the
*.pemfile. - Now press “Save private key”
 and save the private key as a
 *.ppkfile
Terminal connection
Once you have created the
*.ppk private key, you can use it to connect with a putty terminal.- Run
putty.exe - In the the computer address from the "Public DNS" field in the previous section to the Host Name field. In this example we have typed ubuntu@ec2-52-23-164-62.compute-1.amazonaws.com. Use the address of your server.

- Now go to Connection -> SSH -> Auth and set the “Private key file for authentification”. Use the
*.ppkfile.

- Press “Open” to open the connection
- During the first connection you will be informed that “the server host key is not cached in the registry”. Click “Yes” to add the instance to the registry.
Security note: in production environments you should always check the server’s fingerprint BEFORE initiating the connection for the first time. In order to do that right-click the server in AWS management console, select Instance settings & Get system log.
Explore files in your cloud Linux server
Use WinSCP https://winscp.net/eng/download.php to explore files on your virtual server.
- Start WinSCP and click Tools & Run Pageant

- A small pagent icon
 will appear in your taskbar somewhere near your clock. Right-click it and select “Add keys”
 - Select the
*.ppkfile that you have earlier created byputtygen.exe(e.g.somekey.ppk) - Now in the Winscp you can type the hostname (e.g. ec2-52-23-164-62.compute-1.amazonaws.com), user name (ubuntu) and click “Login” to connect. Leave the password field blank – Pageant will handle the authorization for you.